Setting up your own UX lab
We already wrote about the pros and cons of having your own usability Lab. In this Happy Story we tell you more about setting up your own lab. Because what do you have to think about when you want to set up your own lab? Mirrored walls, live streams and recording options; there’s almost too much to mention. We believe that everyone deserves a pleasant research environment. And we are happy to help with that!
Determine your goals
Not entirely unimportant: ask yourself what you want to achieve with your own lab, what is the goal? What kind of research do you want to do? Do you only want to test on desktop and mobile or do you also want group sessions or card sortings, for example? How many people should be able to observe? Do you also want to use the observation room for other purposes? All questions that you must have answered before you go to the drawing board.
Place in the office
Once you have arrived at the drawing board, you must determine where the UX lab will be located. In your own department it will be logical and pleasant, because teammates can easily walk in and join. But it’s sometimes less convenient for respondents. Access gates, for example, can be a barrier. But also registering respondents at the reception can provide extra work. In the context of privacy, a recruitment agency may not always give a first and last name. Therefore, check whether the lab (and possibly also the observation room) can be build in the central hall.
Mirror wall or videostream
In a research room with a mirrored wall you can see every movement of the respondent live. You really get the feeling that you’re close to the respondent, or even in the same room. Unfortunately, a mirror wall also has it’s downsides. The observation room must remain dark. That makes a long research day quite exhausting. You must also take sound issues into account during your observation; laughing out loud because the respondent is taking an unexpected action, may be hearable in the lab. A mirror wall also ensures that the interviewee is more aware that other people are watching. The smaller the lab, the more you suffer from it.
Advantages and disadvantages.. In addition, during a UX test you often look on a screen and do not use the viewing wall. Reasons enough for us to use cameras and a video stream. Moreover, a stream to a (fixed) observation room is also just a lot cheaper than a mirror wall and it ensures you can furnish the room as a meeting room also.
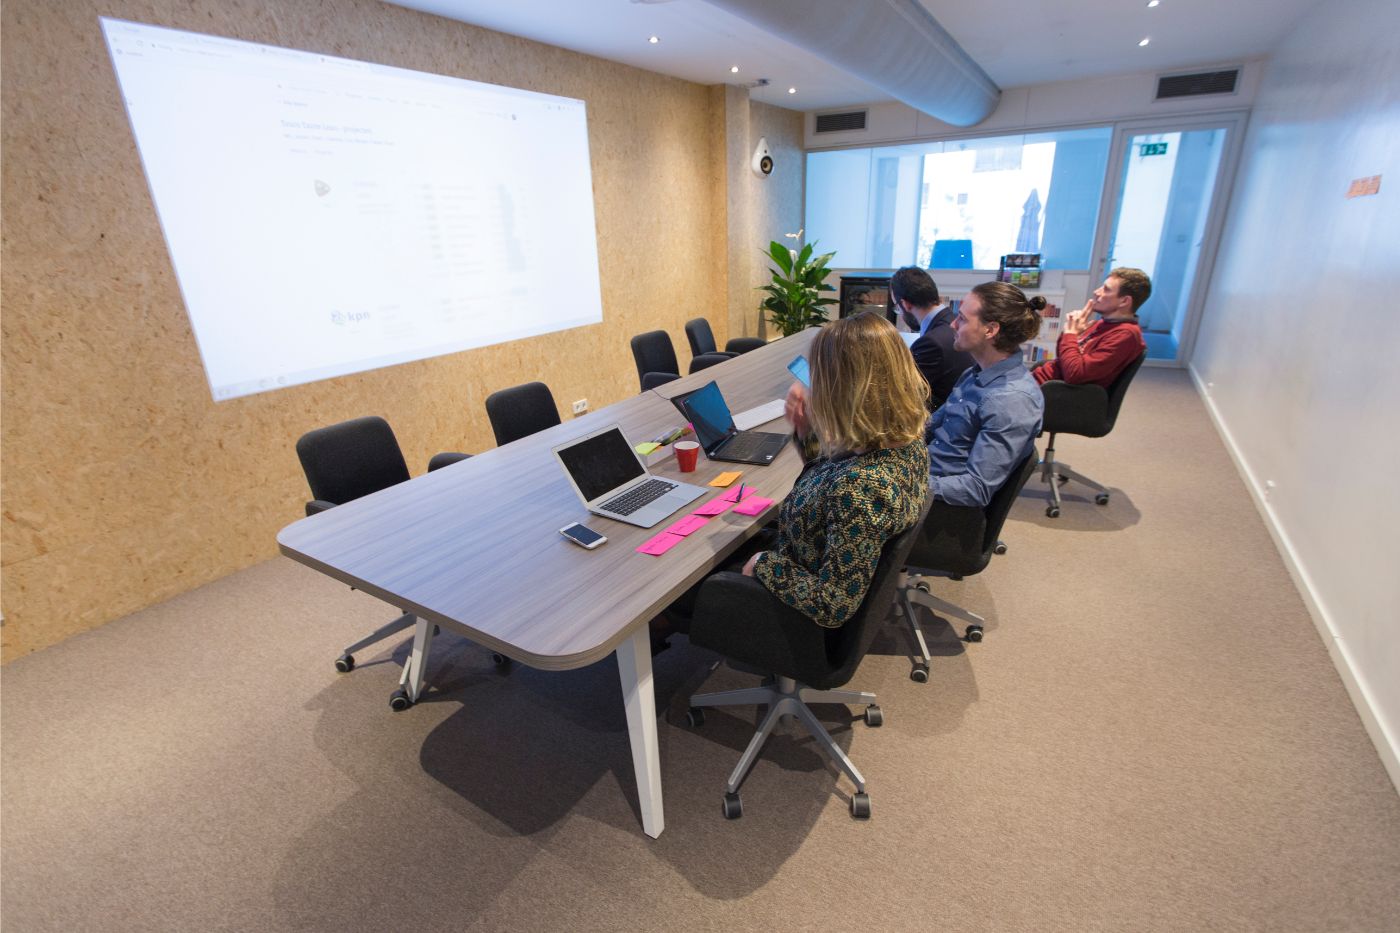
The observationroom
In the observation room you want to facilitate the creative process. Doing research, but especially observing, is an activity for the entire team. Everyone who’s close to the product must be able to sit down to find out what bottlenecks or plus points are. It is nice if there’s natural light in the room. That’ll keep people sharp during a long research day. A lot of whiteboards ensure you can note down all your findings and hang post-its, which you can discuss during a debrief at the end of your field work day. And don’t forget that comfortable chairs are important. After all, you’ll often sit there all day!

So make it a nice space where you like to come together, observe and have debriefs. Of course there must be a computer with a bright (projector / TV) screen in the observation room and separate speakers are not a luxury.
The UX lab
What it’s all about; the UX lab! You want to be able to calmly conduct an interview in the lab. The respondent must be able to feel at ease. Lots of technology or unnecessary mess on the wall will only distract you both. Make it comfortable for you and the respondent.
Fixed space
As we also told in our blog about the advantages and disadvantages of having your own UX Lab, we recommend building the lab in a space reserved for that purpose. This way you prevent hassle with setting up, getting and keeping the technique working. Plug and play, that’s what you want! The observation room, on the other hand, can be set up in a multi-deployable way.
Setup
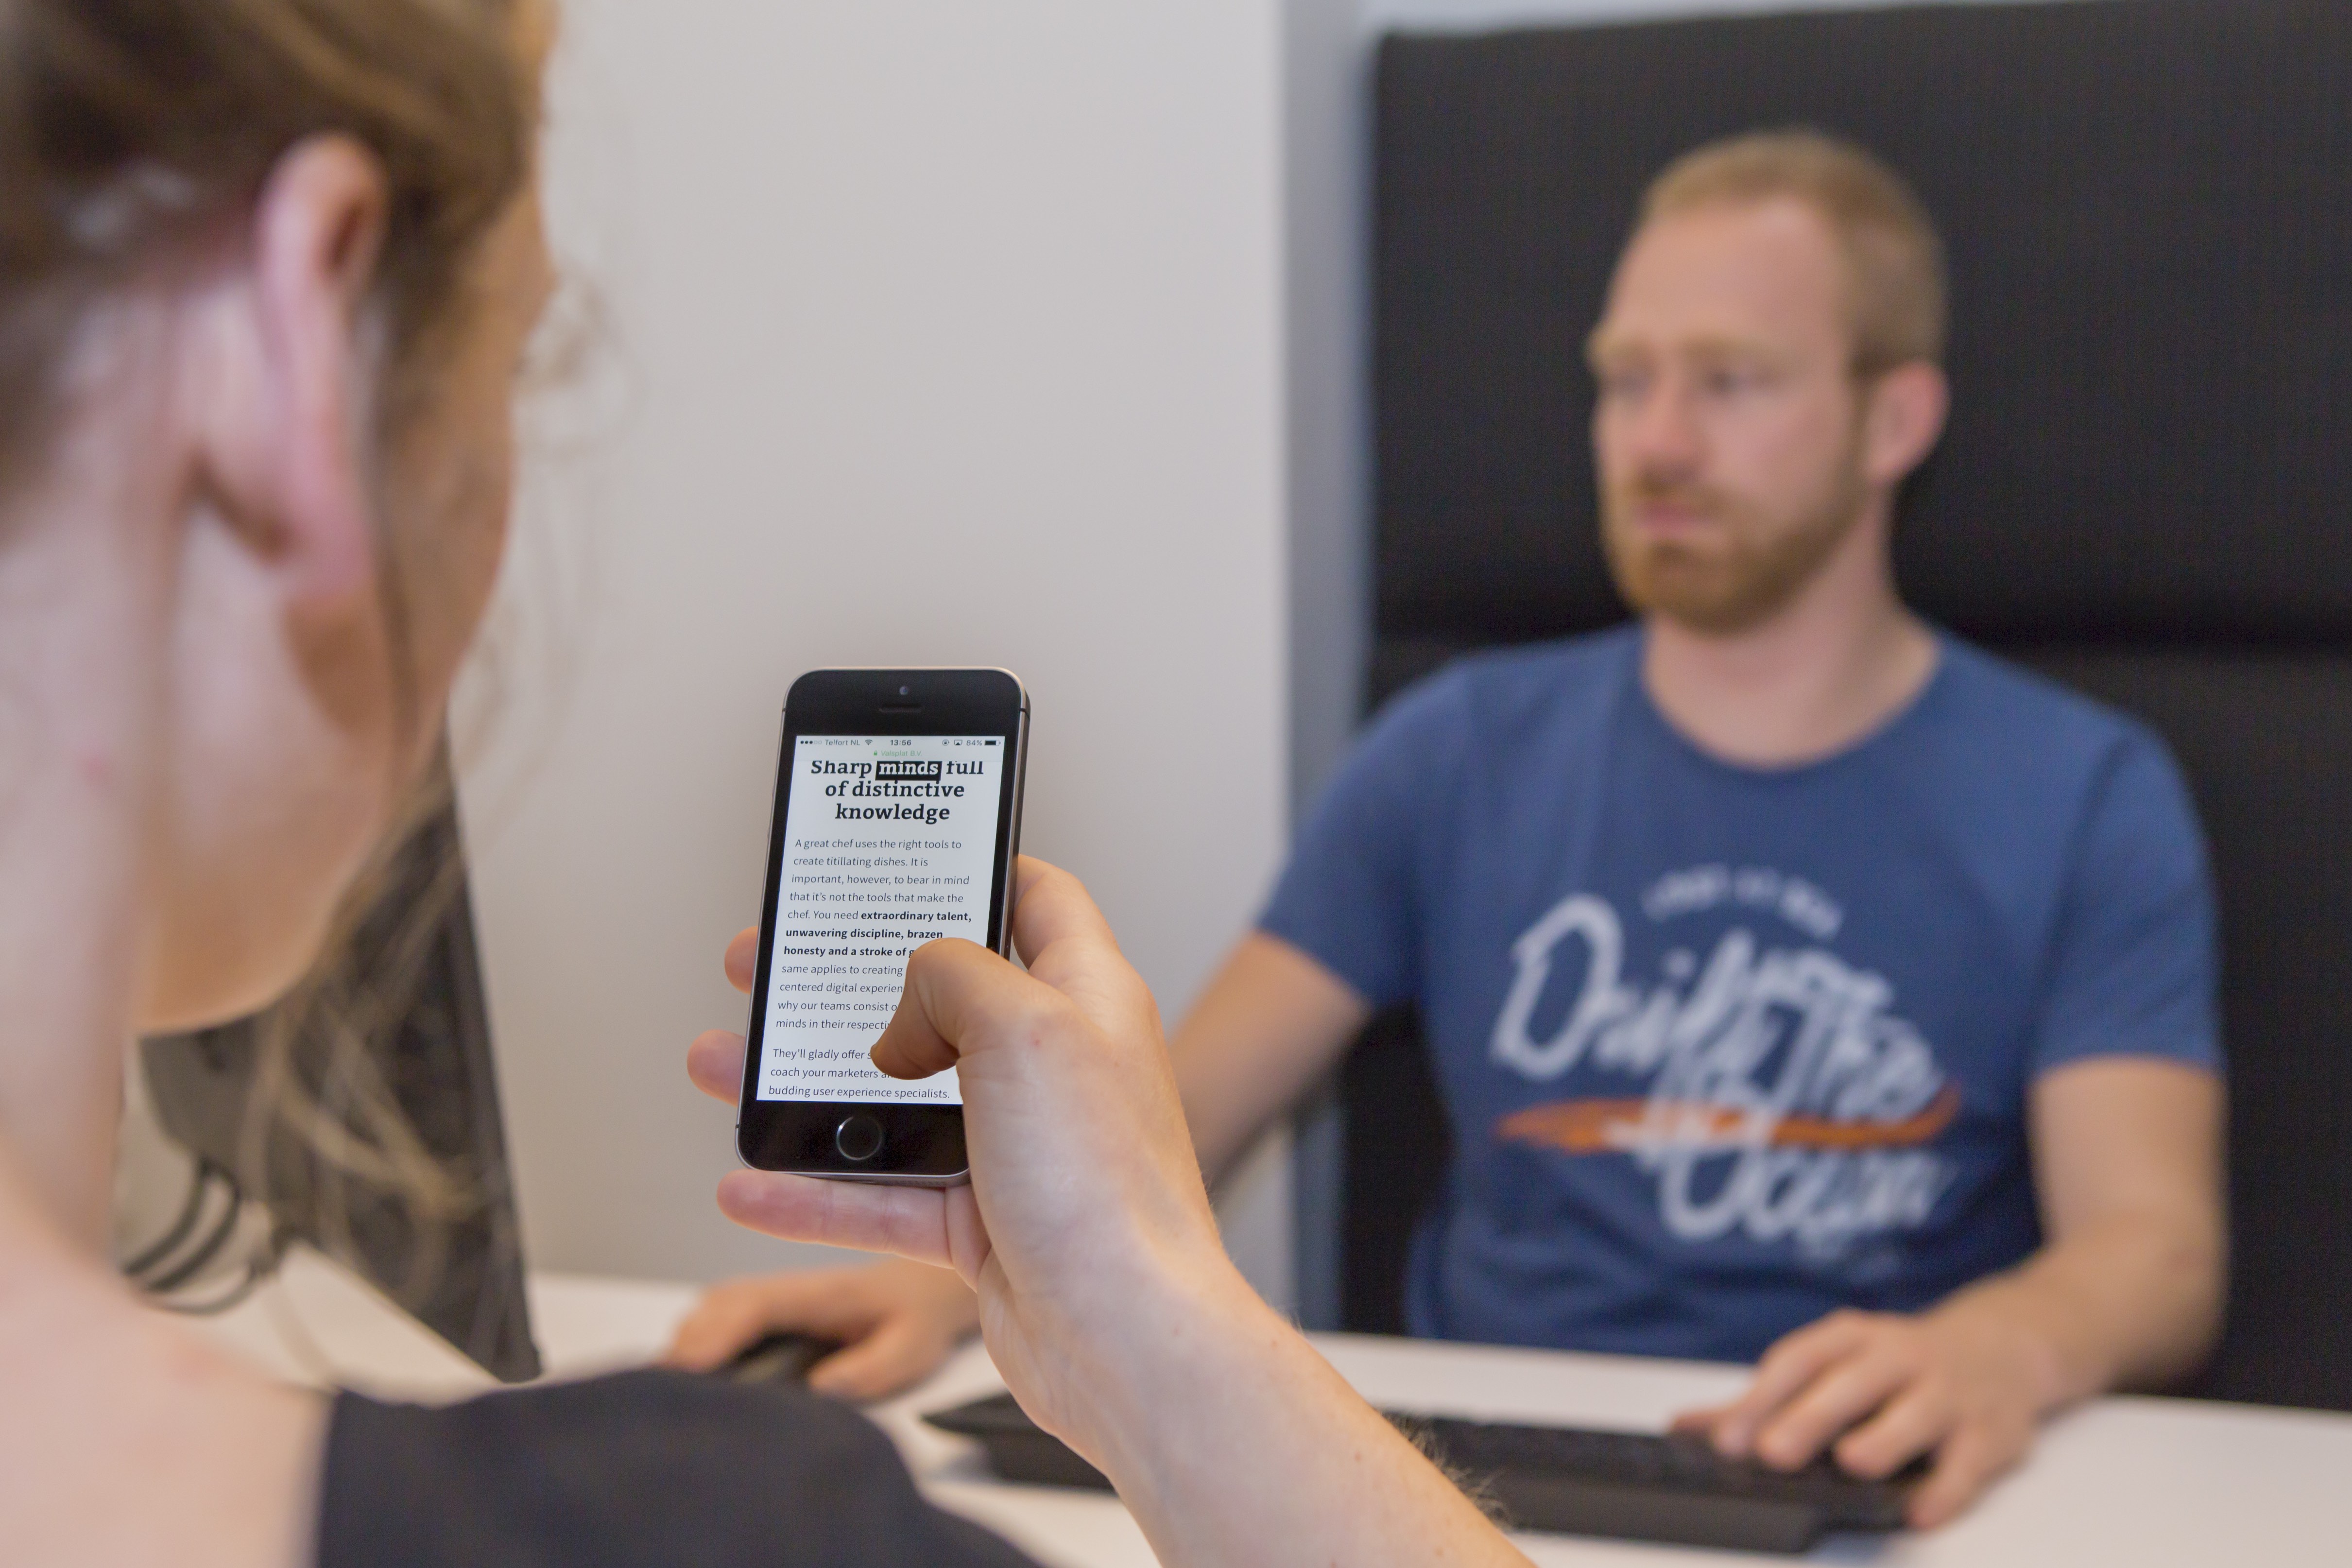
Sit in an angle of 80 or 90 degrees during an interview to ensure that the interviewee has room to avoid eye contact. This can be nice for the respondent during sensitive topics, but makes it more difficult to watch on a (personal) screen. For that reason we’ve designed our setup in such a way that you’re facing the respondent. The respondents can work undisturbed on their own screen or device, while you as a researcher look on your own screen. So no uncomfortable looking over the shoulder. In your own setup, do not sit too close, but just outside the comfort zone. That’s the sweet spot!
Quick start-up and keeping it up & running
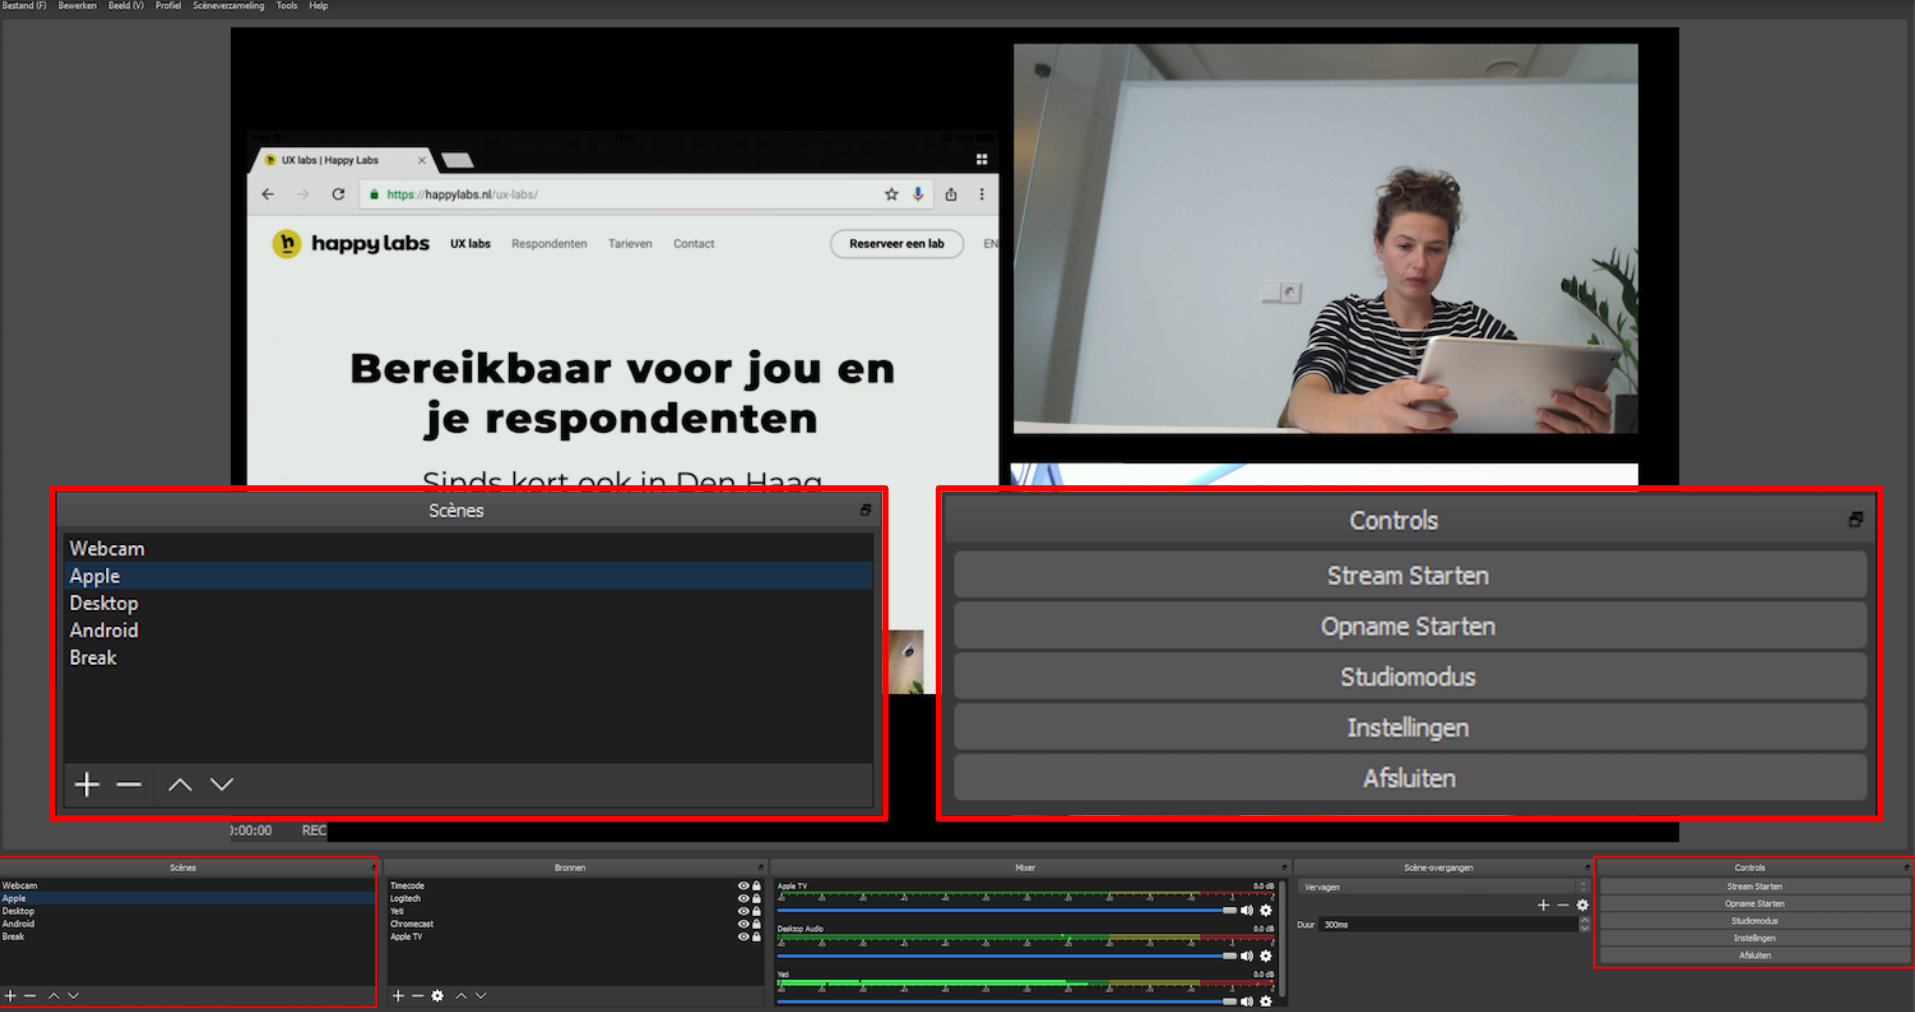
When you enter your lab in the morning, you don’t want to spend hours setting up your equipment. You prefer to have your lab up & running within 5 minutes. Plug and play, remember? Technology must work to your advantage. That’s why we mainly choose software solutions, supplemented with good hardware. We use an open source software, called OBS. A basic household PC or laptop is actually a no-go. The computer that we use in our lab has a fast video card and a hard disk with a lot of storage capacity.
Testing with devices
There’s a large increase in visitor numbers on websites via mobile devices. No big news. That’s why it’s crucial to find a good solution for testing on these devices. The same rule also applies here; make it comfortable. Obvious cameras, cables and other accessories on or around the telephone are useful for you and the observers, but they influence the respondent. It is best to stream a synchronous display of the screen wirelessly to your computer via a Chromecast or AppleTV. You can then immediately watch on your own screen what the respondent is doing. Win win!
Switch
During the study you often want to record the entire journey. The search starts on mobile and then the respondent orders the product on the desktop. Everything must be visible in the observation room or recordings can be shared later with the rest of the stakeholders. With the software in the lab, you’re in control. Switch easily between different combinations of screens and make sure that no moment is lost!
Camera’s
Of course you can record the interview from all possible angles, but is that also necessary? Enough is enough! In our setup we use three cameras to ensure we can follow everything in the observation room. These are the following:
- one camera in the respondent’s screen for facial expressions during desktop testing;
- one camere for during the pre-interview and / or testing on devices;
- one camera for an “over the shoulder look”, so that you can see where the respondent is tapping and sliding.
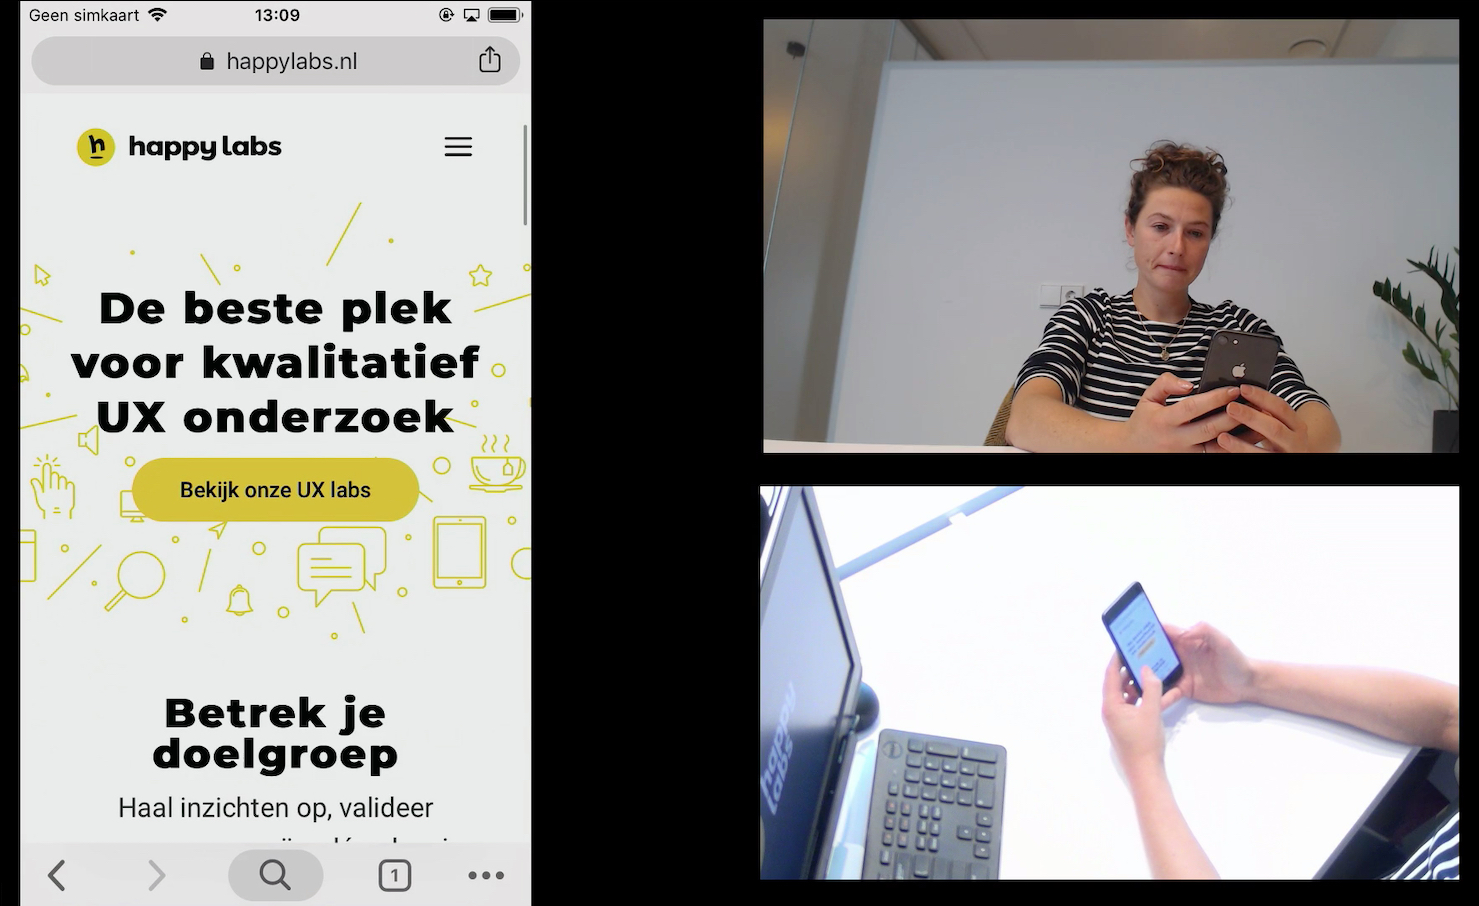
PIP recordings
Picture-In-Picture (PIP) recordings can easily be shared in reports or during a presentation. With a PIP recording you ensure that there’s a merging of images as in the photos above. So no separate recordings from the camera and the image screen capture.The right software can help you capture everything in one image.
Eye tracking
In our opinion, an eye tracker is by no means sacred, but more a useful tool to see where people are looking. You can therefore easily ask specific questions if you see the respondent is looking for something. If you see the respondent is reading, you can also wait quietly for them to finish. And there is another interesting area; because what if the respondent says he hasn’t seen a button, but passed it with an eye movement? That is where psychology comes in.
Eye tracking on desktop
We use a Tobii eye tracker and have it connected to our software so we can watch live on our own screen. Because everyone’s eyes are slightly different, you have to adjust the eye tracker for each respondent (calibration). We’ve installed our eye tracker in a way that the calibration starts with a key combination. Super easy!
Eye tracking on mobile devices
Do they exist? Yes, there are eye trackers for mobile devices. Do you want to use them? Maybe… A specific eye tracker for mobile is big and ungainly and takes the respondent out of his or her natural environment. In our opinion, therefore, the benefit does not outweigh the disadvantage. There are also eye-tracking glasses that partly offer a solution. But this too has more disadvantages than advantages. For example, all glasses wearers are excluded from participation, you can easily look outside the eye-tracking framework and the respondent must put on something unusual. Apart from that, the technology is very expensive and not (yet) easy to link to other live-observing software. It’s a nice addition for analyzing the videos afterwards though.
Heatmaps
We often get the question if we also deliver heatmaps. As you may know, on average about 6 respondents are interviewed during a UX test. So purely qualitative research. That’s why we prefer not to mix quantitative data in our findings. In addition to that, we’re often test websites of apps on which you can scroll up and down. Analyzing heat map data is shown to be very time-consuming.
Watch and share videos
Seeing is believing. Stakeholders are easier convinced when they see visual material. In addition to the PIP videos mentioned earlier, we use a number of tools to make it easier to find that one interesting fragment. These video snippets (also called nuggets) are used in reports or compilation videos.
Timecode
We have placed a time code in the bottom corner in our stream and recording software. The UTC automatically runs in the PIP recordings (referred to in Dutch as coordinated world time). Write down the UTC when you see something remarkable happen so you can easily find, cut and share the fragment.
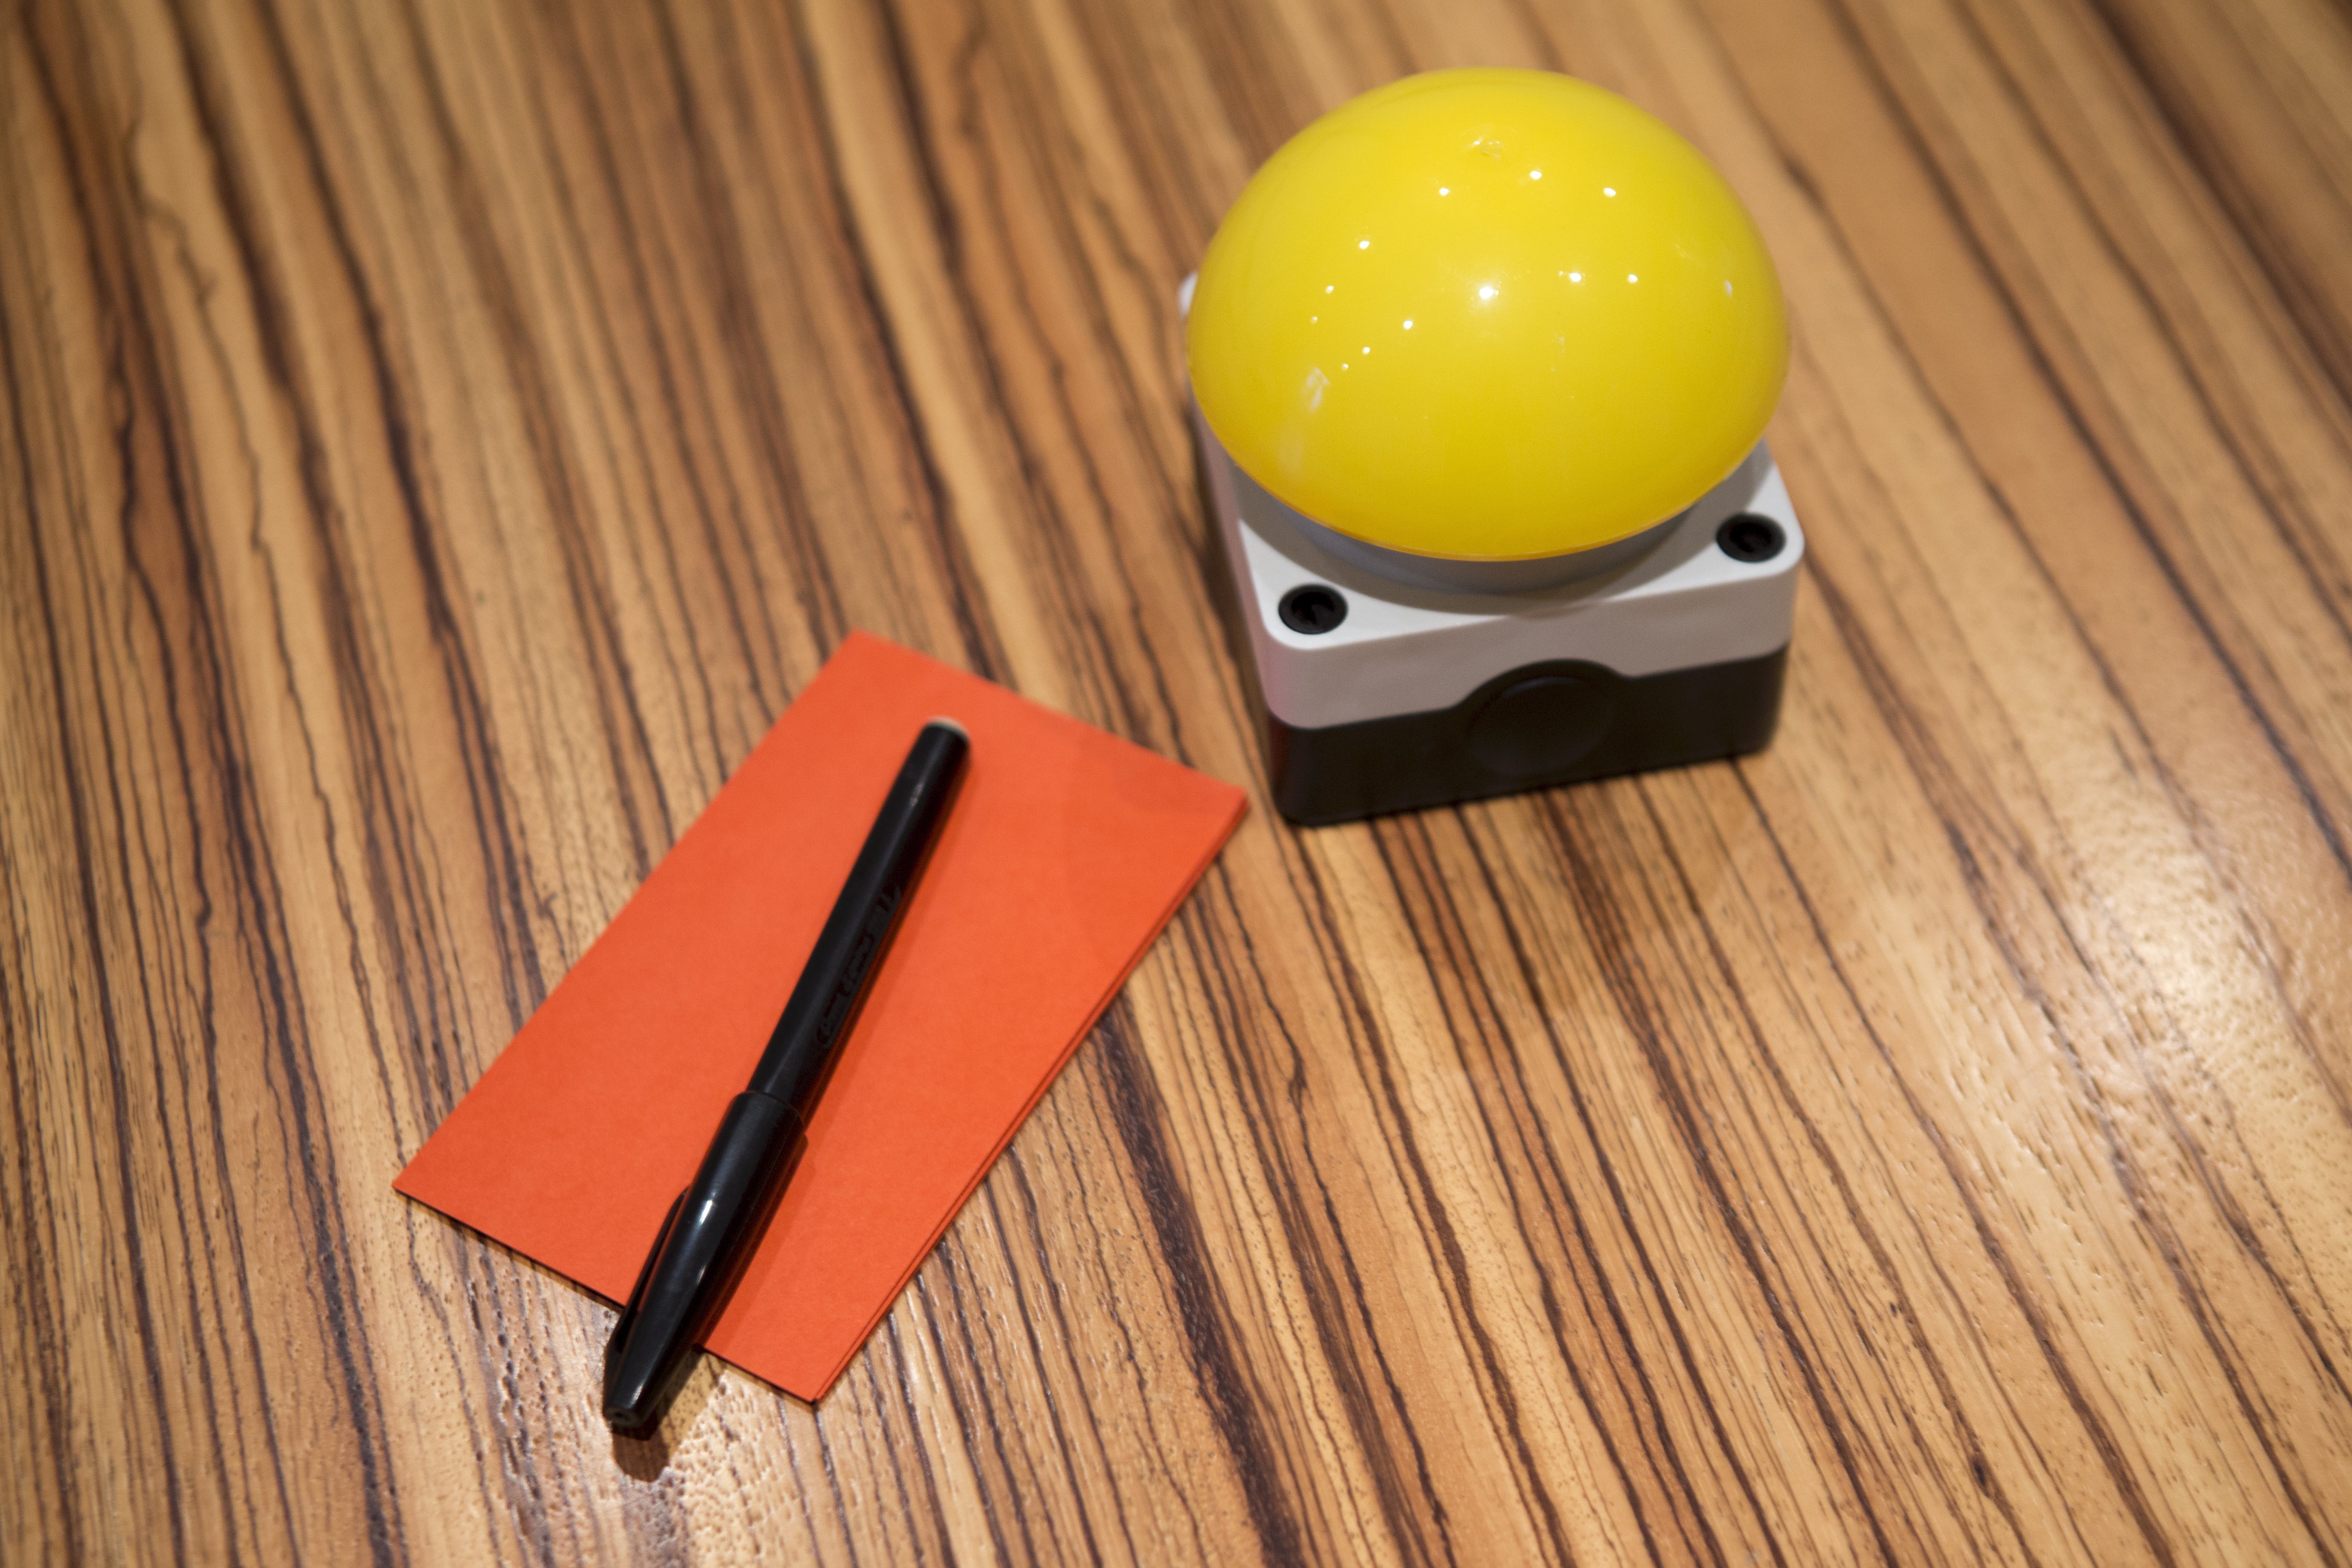
Quick capture button
To make sharing short videos even easier, we have installed a large yellow button and associated software in the observation room. Press the large yellow button and save a video from the last 90 seconds. The fact that it also connects team members is a nice additional advantage.
Getting started with your own lab? We’re happy to help!